2014 Acura MDX Speaker Sizes and Audio System Guide
2014 Acura MDX Speaker Sizes and Audio System Guide
This page covers the 2014 Acura MDX speaker layout, factory audio equipment, and upgrade considerations. The MDX can vary by trim, body style, and audio package, so speaker count and system features are not the same across every version. Use the fitment details here to identify the locations in your vehicle and compare them with the factory setup before choosing replacement speakers or audio upgrades.
Data verified by Nick Marchenko, PhD
Speaker Size Chart – 2014 Acura MDX
Use this table as the main reference. Fitment depends on trim, factory audio package, mounting depth, and adapter availability.
| Location | Type | Factory Size | Note |
|---|---|---|---|
| Front Pillar | Tweeter | 1 inch | if equipped |
| Front Door | Full-Range | 6.5 inch | |
| Dash Corner | Center Channel | 3 inch | if equipped |
| Rear Door | Full-Range | 6.5 inch | |
| Far-Rear Side Panels | Subwoofer | 10 inch | if equipped |
| Rear Pillar | Mid-Range | 3 inch |

Generic speaker location diagram. The table above shows the specific factory sizes for this vehicle. Exact location details may vary by body style and trim.
Speaker Count by Trim – 2014 Acura MDX
Speaker count and audio equipment vary by trim and factory audio package. This table lists known configurations from our database.
| Trim | Speakers | Amplifier | Radio | Navigation |
|---|---|---|---|---|
| 3.5L Advance Pkg w/Entertainment Pkg 4dr All-wheel Drive | 12 | 546W premium | – | – |
| 3.5L Advance Pkg w/Entertainment Pkg 4dr Front-wheel Drive | 12 | 546W premium | – | – |
| 3.5L Technology Package 4dr All-wheel Drive | 10 | 501W premium | – | – |
| 3.5L Technology Package 4dr Front-wheel Drive | 10 | 501W premium | – | – |
| 3.5L 4dr All-wheel Drive | 8 | 432W | – | – |
| 3.5L 4dr Front-wheel Drive | 8 | 432W | – | – |
Data sourced from manufacturer specifications. Verify with the window sticker or dealer before ordering audio components.
Vehicle and Audio System Specifications
This block helps identify the vehicle and its audio system configuration for fitment decisions.
Crossover vs SUV – Audio Differences
This model is offered in more than one body style, and equipment can vary by configuration. Since no body-style-specific speaker data is listed, the main audio differences to watch for are rear speaker placement, optional tweeters or subwoofer equipment, and factory audio package details. Verify the trim and audio system before choosing upgrades.
What Speakers Fit the 2014 Acura MDX?
Aftermarket fitment should start with the factory speaker locations listed for this 2014 Acura MDX, but diameter alone is not enough. Check mounting depth, bracket fit, connector type, and whether the vehicle has a premium or factory-amplified audio system. Factory amplifier details should be verified by trim and audio package, since equipment can vary. Selected audio systems may also include a subwoofer if equipped, so confirm the exact layout before ordering replacement speakers.
Usually Safe Upgrades
- If your vehicle uses the 6.5-inch front door location, that is the main full-range speaker position to match when shopping for replacements.
- If your vehicle uses the 6.5-inch rear door location, look for speakers that match that opening and the factory mounting style.
- If your vehicle uses the 3-inch rear pillar location, choose a speaker sized for that smaller mid-range position.
- If your vehicle uses the 1-inch front pillar tweeter location, replacement tweeters should match that opening if equipped.
- If your vehicle uses the 3-inch dash corner center channel location, verify that the new speaker matches the factory size and role if equipped.
Check Before Buying
- Confirm whether your MDX has the 8-, 10-, or 12-speaker audio layout, since speaker count changes by trim and audio package.
- Measure mounting depth and compare the factory opening before buying, especially for the 6.5-inch door locations.
- Check whether the vehicle has a premium or factory-amplified system, because that can affect speaker choice and installation needs.
- Verify the exact location you are replacing, since tweeters, center channel speakers, and subwoofers are optional equipment.
- Match the speaker type to the location, since full-range, mid-range, tweeter, and subwoofer positions are not interchangeable.
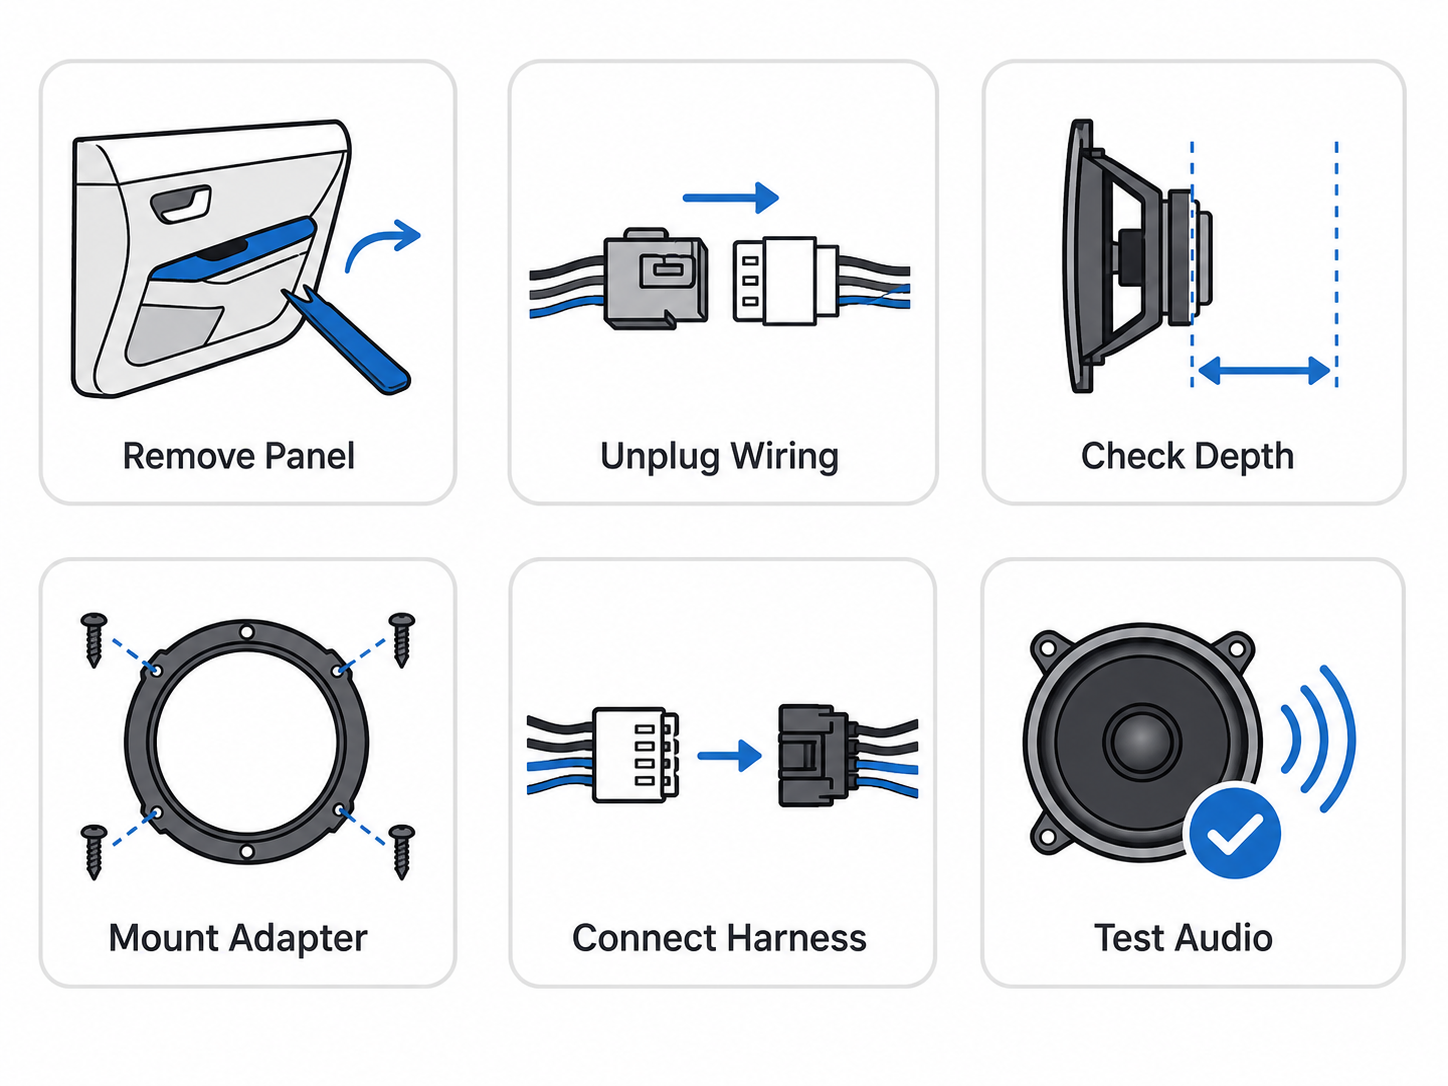
Installation Notes
The 2014 Acura MDX uses a mix of 6.5-inch front and rear door speakers, with 3-inch rear pillar speakers and optional tweeters, center channel, and subwoofer depending on equipment. Before starting, verify the trim and audio package so you know which speaker locations are present and whether the factory amplifier is included. Panel removal should be done carefully to avoid breaking clips or scratching trim, especially around the front pillars, dash corners, and rear side panels. Check speaker depth before ordering replacements, since space can be tight in some locations. Mounting adapters may be needed for secure fitment, and harness adapters can help preserve the factory wiring. If your vehicle has the factory subwoofer, confirm enclosure access and wiring before removal. After installation, test each speaker location one at a time to confirm polarity, balance, and overall system operation before reinstalling all panels.
This installation is moderately difficult because trim removal, equipment variation, and speaker depth checks require careful planning.
Common Mistakes When Replacing Speakers
The 2014 Acura MDX can vary a lot by trim and audio package, so the biggest mistakes usually happen when buyers assume every system uses the same speaker layout or hardware.
- Buying based only on the body-style label instead of checking actual speaker locations on the vehicle.
- Skipping trim and audio package verification, even though speaker count, amplifier output, and radio/navigation setup can change from 8 to 12 speakers.
- Ordering replacement speakers without checking mounting depth and connector style first, which can cause fitment problems behind the front doors, rear doors, or dash locations.
- Assuming the tweeters or subwoofer are present on every vehicle, when those components are only included if equipped.
- Ignoring the factory amplifier details and choosing parts without matching the system level, especially on trims with premium audio packages.
- Reassembling the panels before testing the system, which can hide wiring or channel issues and force you to take everything apart again.
Generation & Model Family
The 2014 Acura MDX belongs to the Third generation (YD3) (2014–2016) family. Nearby model years often share similar speaker locations and audio layouts, but exact fitment can vary by trim and audio package – verify before ordering.
Recommended Upgrade Path
The 2014 Acura MDX uses an audio layout that can vary by trim and equipment package, so the best upgrade path depends on what is already installed. Most buyers will get the biggest improvement from the front stage first, then decide whether to add bass, increase output, or keep the cabin looking original while improving sound quality.
| Goal | Best Upgrade Path | Why |
|---|---|---|
| Better clarity | Upgrade the front door speakers first, then match them with the front pillar tweeters if equipped. A stronger front stage usually brings cleaner vocals, sharper detail, and better stereo imaging. | Clarity starts up front, and this model may include tweeters depending on equipment. Improving the front speakers and tweeters together helps the system sound more open and precise. |
| More bass | If the factory subwoofer is equipped, consider replacing it with an aftermarket subwoofer solution and checking the enclosure and power handling first. If no subwoofer is installed, adding a subwoofer is the most effective way to extend low-end output. | Bass upgrades are most noticeable when the low-frequency load is handled separately from the main speakers. Factory subwoofer details should be verified by trim and audio package before planning the upgrade. |
| Louder sound | Properly matched speakers and amplifier integration can improve volume and reduce distortion. Verify factory amp and premium system integration before adding aftermarket amplifiers, then build around the front speakers and main channels. | Higher output works best when the speakers and amplification are matched correctly. This helps the system play louder without sounding strained. |
| Budget improvement | Replace the front door speakers first with same-size replacement speakers with correct mounting brackets. This gives the best value because the front doors handle the most important everyday listening. | A front-door-first approach delivers a noticeable upgrade without replacing the entire system. It is usually the most cost-effective way to improve everyday sound quality. |
| Factory look | Use same-size replacement speakers with the correct mounting brackets and harness adapters for a clean install that preserves the factory wiring and appearance. | This approach keeps the cabin looking original while still improving sound. It also makes the upgrade easier to integrate with the existing audio layout. |
Mounting Adapters and Wiring
The same nominal diameter does not guarantee a direct mount. Before ordering, confirm:
- Speaker depth: Aftermarket speakers often have larger magnets – measure available depth at each location.
- Mounting brackets: Door locations typically need a bracket or spacer to clear the window regulator and achieve correct mounting depth.
- Wiring harness adapters: Use a plug-and-play harness adapter to preserve factory wiring.
- Tweeter mounting cups: Replacing OEM tweeters may require surface-mount cups or brackets depending on the location.
- Factory or premium amplified systems: If the vehicle has a premium or factory-amplified audio system, confirm how the factory radio, amplifier, and speakers are connected before adding aftermarket amplifiers. Depending on the setup, a line output converter, DSP, integration harness, or professional installation may be needed.
- Connector type: Factory connectors vary by trim and model year – confirm compatibility before splicing or using an adapter.
Frequently Asked Questions
What size are the front door speakers in a 2014 Acura MDX?
The front door speakers are 6.5 inches. This size is listed for the model data provided, and it applies across the MDX speaker layout shown here.
What size are the rear speakers in a 2014 Acura MDX?
The rear door speakers are 6.5 inches. The vehicle also uses a rear pillar 3-inch mid-range in the listed audio setup.
Does the 2014 Acura MDX have a factory subwoofer?
A 10-inch subwoofer is listed if equipped. Factory subwoofer availability can vary by trim and audio package, so it should be verified for the specific vehicle.
Do I need mounting adapters to replace the speakers?
Mounting adapters may be needed depending on the speaker location and the replacement speaker design. The factory sizes include 6.5-inch doors, 3-inch rear pillar speakers, and optional 1-inch tweeters if equipped.
Can I replace the speakers without replacing the radio?
Yes, speaker replacement can be done without replacing the radio in many cases. The factory radio and audio package can vary by trim, so the best setup depends on the exact system in the vehicle.
How do I verify the factory amplifier in a 2014 Acura MDX?
Factory amplifier details should be verified by trim and audio package. The provided data shows different premium audio systems across trims, including 432W, 501W, and 546W setups.