2012 GMC Sierra 1500 Speaker Sizes and Audio System Guide
2012 GMC Sierra 1500 Speaker Sizes and Audio System Guide
This page summarizes the factory speaker layout for the 2012 GMC Sierra 1500 and highlights what can change before you shop for upgrades. Equipment varies by trim, body style, and audio package, so speaker count and factory audio features can differ across trucks. Use this guide to confirm speaker locations, check the sizes listed for your configuration, and plan an upgrade with the right fit in mind.
Data verified by Nick Marchenko, PhD
Speaker Size Chart – 2012 GMC Sierra 1500
Use this table as the main reference. Fitment depends on trim, factory audio package, mounting depth, and adapter availability.
| Location | Type | Factory Size | Note |
|---|---|---|---|
| Front Pillar | Full-Range | 5.25 inch | |
| Front Pillar | Tweeter | .75 inch | if equipped |
| Front Door | Full-Range | 5.25 inch | |
| Front Door | Full-Range | 6.5 inch | |
| Rear Door | Full-Range | 6.5 inch | |
| Rear Door | Subwoofer | 6.5 inch | if equipped |
| Rear Door | Full-Range | 5.25 inch | |
| Front Center Console | Tweeter | .75 inch | if equipped |
| Front Center Console | Subwoofer | 6.5 inch | if equipped |

Generic speaker location diagram. The table above shows the specific factory sizes for this vehicle. Exact location details may vary by body style and trim.
Speaker Count by Trim – 2012 GMC Sierra 1500
Speaker count and audio equipment vary by trim and factory audio package. This table lists known configurations from our database.
| Trim | Speakers | Amplifier | Radio | Navigation |
|---|---|---|---|---|
| Denali 4x2 Crew Cab 5.75 ft. box 143.5 in. WB | 7 | std | – | – |
| Denali 4x4 Crew Cab 5.75 ft. box 143.5 in. WB | 7 | std | – | – |
| SLT 4x2 Crew Cab 5.75 ft. box 143.5 in. WB | 7 | std | – | – |
| SLT 4x2 Extended Cab 6.6 ft. box 143.5 in. WB | 7 | std | – | – |
| SLT 4x2 Extended Cab 8 ft. box 157.5 in. WB | 7 | std | – | – |
| SLT 4x4 Crew Cab 5.75 ft. box 143.5 in. WB | 7 | std | – | – |
| SLT 4x4 Extended Cab 6.6 ft. box 143.5 in. WB | 7 | std | – | – |
| SLT 4x4 Extended Cab 8 ft. box 157.5 in. WB | 7 | std | – | – |
| SL 4x2 Crew Cab 5.75 ft. box 143.5 in. WB | 6 | – | – | – |
| SL 4x2 Extended Cab 6.6 ft. box 143.5 in. WB | 6 | – | – | – |
| SL 4x4 Crew Cab 5.75 ft. box 143.5 in. WB | 6 | – | – | – |
| SL 4x4 Extended Cab 6.6 ft. box 143.5 in. WB | 6 | – | – | – |
| SLE 4x2 Crew Cab 5.75 ft. box 143.5 in. WB | 6 | opt | – | – |
| SLE 4x2 Extended Cab 6.6 ft. box 143.5 in. WB | 6 | opt | – | – |
| SLE 4x2 Extended Cab 8 ft. box 157.5 in. WB | 6 | opt | – | – |
| SLE 4x4 Crew Cab 5.75 ft. box 143.5 in. WB | 6 | opt | – | – |
| SLE 4x4 Extended Cab 6.6 ft. box 143.5 in. WB | 6 | opt | – | – |
| SLE1 4x4 Extended Cab 8 ft. box 157.5 in. WB | 6 | opt | – | – |
| Work Truck 4x2 Crew Cab 5.75 ft. box 143.5 in. WB | 6 | – | – | – |
| Work Truck 4x2 Extended Cab 6.6 ft. box 143.5 in. WB | 6 | – | – | – |
| Work Truck 4x2 Extended Cab 8 ft. box 157.5 in. WB | 6 | – | – | – |
| Work Truck 4x4 Crew Cab 5.75 ft. box 143.5 in. WB | 6 | – | – | – |
| Work Truck 4x4 Extended Cab 6.6 ft. box 143.5 in. WB | 6 | – | – | – |
| Work Truck 4x4 Extended Cab 8 ft. box 157.5 in. WB | 6 | – | – | – |
| Xtra Fuel Economy 4x2 Crew Cab 5.75 ft. box 143.5 in. WB | 6 | opt | – | – |
| SLE 4x2 Regular Cab 6.6 ft. box 119 in. WB | 4 | – | – | – |
| SLE 4x2 Regular Cab 8 ft. box 133 in. WB | 4 | – | – | – |
| SLE 4x4 Regular Cab 6.6 ft. box 119 in. WB | 4 | – | – | – |
| SLE 4x4 Regular Cab 8 ft. box 133 in. WB | 4 | – | – | – |
| Work Truck 4x2 Regular Cab 6.6 ft. box 119 in. WB | 4 | – | – | – |
| Work Truck 4x2 Regular Cab 8 ft. box 133 in. WB | 4 | – | – | – |
| Work Truck 4x4 Regular Cab 6.6 ft. box 119 in. WB | 4 | – | – | – |
| Work Truck 4x4 Regular Cab 8 ft. box 133 in. WB | 4 | – | – | – |
Data sourced from manufacturer specifications. Verify with the window sticker or dealer before ordering audio components.
Vehicle and Audio System Specifications
This block helps identify the vehicle and its audio system configuration for fitment decisions.
What Speakers Fit the 2012 GMC Sierra 1500?
Aftermarket fitment should start with the factory speaker locations listed above, but diameter alone is not enough. Check mounting depth, bracket fit, connector type, and whether the vehicle has a premium or factory-amplified audio system. This 2012 GMC Sierra 1500 uses several possible speaker sizes depending on location and equipment, so the safest match comes from verifying the exact opening before ordering. Selected audio systems may also include a subwoofer if equipped.
Usually Safe Upgrades
- If your vehicle uses the 5.25 inch front pillar location, a 5.25 inch full-range speaker is the closest size match.
- If your vehicle uses the 5.25 inch front door location, a 5.25 inch full-range speaker is the closest size match.
- If your vehicle uses the 6.5 inch front door or rear door location, a 6.5 inch full-range speaker is the closest size match.
- If your vehicle uses the .75 inch tweeter location, a .75 inch tweeter can be matched when equipped.
- If your vehicle uses the 6.5 inch rear door subwoofer location, a 6.5 inch subwoofer can be matched when equipped.
Check Before Buying
- Confirm the exact speaker location in your truck, since the same model can use different sizes in the front and rear.
- Verify whether your audio system is factory-amplified or premium, because speaker choice can change with the system layout.
- Measure mounting depth and check the factory opening, since size alone does not guarantee a proper physical match.
- Inspect the connector style before ordering so the replacement can be wired correctly.
- If your truck has tweeters or a subwoofer, confirm that those components are actually present before selecting replacement parts.
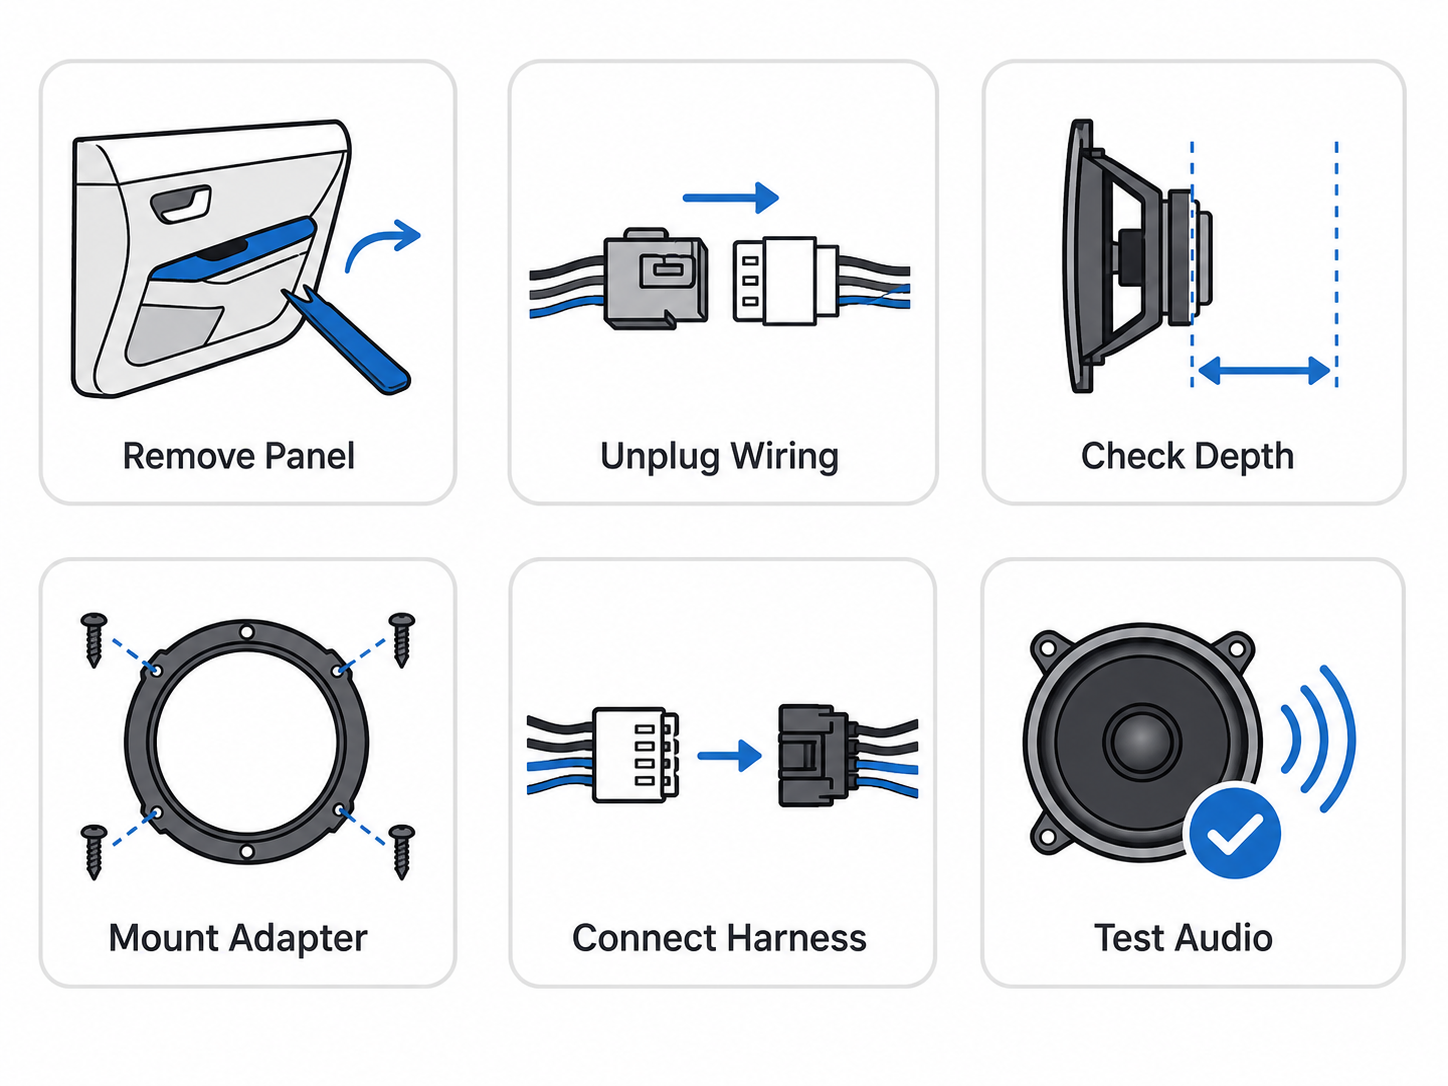
Installation Notes
The 2012 GMC Sierra 1500 uses a speaker layout that can vary by trim and audio package, so verify the exact system before ordering parts. Front pillar, front door, rear door, and front center console speaker locations are listed in the data, and some vehicles may also include tweeters or a factory subwoofer if equipped. Plan on removing interior panels carefully to access the speakers, since clips and trim pieces can be easy to damage if forced. Check speaker depth before installation, especially in the doors and rear locations, because space can be limited. Mounting adapters may be needed to match the factory opening, and harness adapters can help keep the wiring clean and reversible. If your vehicle has the factory subwoofer, confirm the enclosure and wiring before replacing it. Factory amplifier details should be verified by trim and audio package, since amplifier presence is not universal. After installation, test each speaker location for balance, polarity, and proper operation before reinstalling all panels.
Moderate difficulty, with fitment depending on trim, audio package, and speaker location.
Common Mistakes When Replacing Speakers
When shopping for speaker upgrades on the 2012 GMC Sierra 1500, the biggest errors usually come from assuming every truck uses the same audio layout.
- Buying based only on the body-style label instead of checking actual speaker locations on the vehicle.
- Ignoring trim and audio package differences, since speaker count can range from 4 to 7 and factory amplifier details should be verified by trim and audio package.
- Assuming every truck has the same tweeter or subwoofer setup, when tweeters and subwoofer locations may be included only if equipped.
- Choosing speakers without checking mounting depth and connector style, which can cause fitment problems even when the size looks correct on paper.
- Skipping a full test of every speaker location before reassembly, especially on trucks with optional audio equipment or multiple speaker locations.
- Overlooking the factory radio and navigation setup, since those details vary by trim and can affect how the system should be upgraded or retained.
Generation & Model Family
The 2012 GMC Sierra 1500 belongs to the Third generation (GMT900) (2007–2013) family. Nearby model years often share similar speaker locations and audio layouts, but exact fitment can vary by trim and audio package – verify before ordering.
Recommended Upgrade Path
The 2012 GMC Sierra 1500 uses different speaker layouts depending on trim and audio package, so equipment can vary from one truck to another. A smart upgrade plan starts with the front stage, then moves to bass and amplification if you want more output. Factory amplifier details should be verified by trim and audio package before planning larger system changes.
| Goal | Best Upgrade Path | Why |
|---|---|---|
| Better clarity | Upgrade the front pillar and front door speakers first, and replace the front tweeters if equipped. Focus on cleaner midrange and high-frequency response before moving to the rear of the truck. | The front stage does most of the work for vocals and detail, so improving those speakers gives the biggest jump in clarity. If tweeters are equipped, matching them with better front speakers can sharpen the sound without changing the whole system. |
| More bass | If a factory subwoofer is equipped, confirm how it is integrated before changing it, then add an aftermarket subwoofer system to build deeper low-end output. If no sub is equipped on your trim, adding a subwoofer is the most effective way to complement the factory speakers. | Bass upgrades work best when the low-frequency load is handled separately from the main speakers. A factory subwoofer may be trim-dependent, so it should be checked before planning the upgrade path. |
| Louder sound | Use properly matched speakers and amplifier integration to improve volume and reduce distortion. Verify factory amp and premium system integration before adding aftermarket amplifiers, especially on trims where amplifier equipment can vary. | Higher output depends on both speaker choice and clean power delivery. Matching the system correctly helps the truck play louder without sounding strained, and it reduces the risk of integration issues with factory audio equipment. |
| Budget improvement | Replace the most-used front door speakers first, then move to the rest of the cabin later if needed. Choose same-size replacement speakers with correct mounting brackets. | Front door speakers usually deliver the most noticeable everyday improvement for the money. Starting there keeps the upgrade focused and lets you improve sound step by step without replacing everything at once. |
| Factory look | Use same-size replacement speakers with the correct mounting brackets and harness adapters for a clean install that preserves the factory wiring and appearance. | This approach keeps the interior looking original while still improving sound quality. It also helps the upgrade stay tidy and reversible, which is useful if you want the truck to look stock from the outside and inside. |
Mounting Adapters and Wiring
The same nominal diameter does not guarantee a direct mount. Before ordering, confirm:
- Speaker depth: Aftermarket speakers often have larger magnets – measure available depth at each location.
- Mounting brackets: Door locations typically need a bracket or spacer to clear the window regulator and achieve correct mounting depth.
- Wiring harness adapters: Use a plug-and-play harness adapter to preserve factory wiring.
- Tweeter mounting cups: Replacing OEM tweeters may require surface-mount cups or brackets depending on the location.
- Factory or premium amplified systems: If the vehicle has a premium or factory-amplified audio system, confirm how the factory radio, amplifier, and speakers are connected before adding aftermarket amplifiers. Depending on the setup, a line output converter, DSP, integration harness, or professional installation may be needed.
- Connector type: Factory connectors vary by trim and model year – confirm compatibility before splicing or using an adapter.
Frequently Asked Questions
What size are the front door speakers in a 2012 GMC Sierra 1500?
Front door speaker sizes vary by audio setup. The data lists 5.25-inch and 6.5-inch full-range front door speakers, so you should verify the exact size by trim and audio package before ordering parts.
What size are the rear speakers in a 2012 GMC Sierra 1500?
Rear door speaker sizes also vary by configuration. The listed sizes are 6.5-inch and 5.25-inch full-range speakers, and some setups may include a 6.5-inch subwoofer if equipped.
Does the 2012 GMC Sierra 1500 have a factory subwoofer?
A factory subwoofer is listed on some audio systems if equipped. The data shows a 6.5-inch subwoofer in the rear door area and a 6.5-inch subwoofer in the front center console on certain setups.
Can I replace the speakers without replacing the radio?
Yes, speaker replacement can be done while keeping the factory radio in place. Just match the speaker size and confirm whether your truck has the standard or upgraded audio setup before buying parts.
Do I need mounting adapters for speaker replacement?
Mounting adapters may be needed depending on the speaker size and location. Since the truck uses multiple front and rear speaker sizes, it is best to verify the exact opening before choosing adapters.
Does the 2012 GMC Sierra 1500 have a factory amplifier?
Factory amplifier details should be verified by trim and audio package. The data shows some trims with standard amplification, some with optional amplification, and others with N/A listed.